Getting tensorflow to use hardware acceleration is challenging. There’s plenty of tutorials to show you how to do it, but I’ve found that most of them lack sufficient detail, aren’t targeted towards what I’m doing (they’re made for super computing clusters or fine-grain control, or something), or are outdated. The ML field is moving fast right now, and things get outdated fast.
Well, here’s yet another blog post. This is what I did to get tensorflow to connect to my GPU, maybe it’ll help you.
Hardware
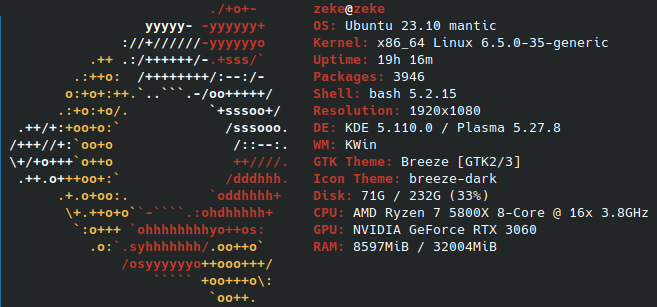
First off, some hardware. Tensorflow seems to work best on NVIDIA GPUs. I’m told it’s possible to get it to work on an AMD GPU, but the one time I tried, I couldn’t get it to work. You can see this for-pay article for more guidance, in that case.
Here’s my screenfetch: 
Guide
When I set it up, I followed this blog post. It contains a lot of good detail, so instead of repeating everything it says, just follow it, and I’ll tell you what I had to change to get it to work.
When installing drivers, I installed nvidia-driver-550, and then had to restart to activate it, which isn’t in the tutorial. According to this page, anything >=520.;61.05 should work. Later on, while trying to debug the later steps, I ended up installing 525 as well, however, I don’t think that actually fixed anything.
I also had to install the cuda-toolkit package (sudo apt install cuda-toolkit) to get it to run, which isn’t mentioned in the post.
Instead of the versions specified in the post, I used these versions specifically:
- python3.11
- cuDNN==8.8
- cudatoolkit==11.8
- tensorflow==2.14
NOTE: The cudatoolkit version is the version of the Python package; upon running nvidia-smi, my driver says it’s CUDA version 12.2. This didn’t seem to cause problems.
I used this table from the post to align all the versions. I had a bit of a problem, because as of 5/22/24, cuDNN==8.7 doesn’t exist on conda for some reason, and cudatoolkit>=12 was not released on conda yet, so had to use python3.11 and guess at some of the package versions, but the ones I used worked out.
After following all the steps in the post and running the benchmark test mentioned, it threw and error with a bunch of warnings and errors and traceback and other stuff. After digging through it and some research, I found this stackoverflow post that advised running this command:
export XLA_FLAGS=--xla_gpu_cuda_data_dir=/usr/lib/cuda
which worked. You may want to follow the steps in the article to find your specific cuda installation path, but it’s likely /usr/lib/cuda. You’ll also likely want to put that line in your ~/.bashrc file, so it will work in other terminals as well.
My benchmarks were:
- GPU: 17.934 seconds
- CPU: 219.757 seconds
A 12.25x speedup! Not bad!